 RSS Feed
 Twitter
 9:29 AM
 SiliconValleySousVide
After extensive research on the web, I settled on the Sous Vide Supreme (SVS) water bath as my first sous vide piece of equipment. I chose the SVS for a couple of reasons:
- Cost effective. I got it for $499 on amazon, which was 60% of the immersion circulators. Since I didn't really know if I was going to be passionate about sous vide cooking, I felt more comfortable in that price range.
- Good size. I looked at the $399 demi sous vide supreme and decided against it for the size. I figured I would be cooking for a family and the regular seemed to be more the size I would want.
- Self contained and good looking. Yes, looks do matter in my kitchen (my wife would concur!)

Once
the SVS arrived I tried out some sous vide. I already had a foodsaver
vacuum sealer and it worked well for dry prep, but for prep that had
liquids (sauces or EVO), as all the literature states, it didn't really
work.
So
this led me to my next piece of equipment, the chamber vacuum sealer.
Again after much research on the web, I settled on the ARY Vacmaster VP112. Again, I chose the VP112 for a couple reasons:
- Again, reasonably priced. Many of the chamber sealers were in the $2000 to $3000 range and mainly made for continuous "restaurant" usage. As such they had oil lubricated pumps that require maintenance and are expensive. The VP112 uses a dry pump mechanism that is slightly less sturdy as the oil ones, but for home use, I don't feel I'll ever get to that point! And at a price of $600, it was a great alternative.
- Liquid capable sealing. This is true for all chamber sealers and was a requirement for me. Many of the sous vide dishes require some kind of liquid to be poured into the bags to marinate and infuse the food being cooked. The literature says that you can "freeze" the liquid before sealing, but that takes even more time and wasn't an option for me.
- Counter height compliant and good looking. Since it was going on my counter and I have wall cabinets (as do most home owners!), the counter height compliance was a big plus. Most of the other chamber sealers do not meet this requirement. The good looks goes without saying (although my wife didn't like the looks of the VP112 as much as the SVS).


So
now I'm rocking and rolling with my SVS and VP112. I start doing lots
of sous vide cooking for the family. It's working great, but then I
start having more gatherings of friends! It's amazing how that happens
with sous vide! Well, before you know it, I'm faced with two problems:
1) Increasingly I'm trying to sous vide two items at different
temperatures at the same time. With only one SVS, I have to cook sous
vide serially. 2) While the SVS is great for a family size meal, it
can't really do "party size" meals. For example, I tried to cook 6
racks of BB ribs and it kept "beeping", indicating it couldn't hold the
temperature because the thermal "flow" (which it depends on) was getting
blocked by all the bags.
So back to research and I decided to get an immersion circulator (IC) as a second device. I settled on the Polyscience Sous Vide Professional Chef. I chose the Polyscience for the following reasons:
- Price and Availability. The Polyscience was being sold on eBay at much lower price than retail($750). I was able to get one for $500 brand new (minus instructions, but who needs instructions!).
- Features. The Polyscience was designed specifically for sous vide. Many of the immersion circulators are "scientific" lab equipment. So they aren't directly suited for sous vide cooking. Some don't have a dual display (set and actual), that is critical. some don't have a heating element guard, again critical for sous vide cooking.
- Portability and Looks. It is a very compact unit that can be stored in a draw out of sight. Since it is my "second" go to unit, this keeps the clutter to a minimum. Also, it really looks nice!


So the total outlay for my sous vide kitchen was:
- $500 (SVS)
- $600 (VP112)
- $525 (Polyscience IC) on ebay
- $ 50 in flat bags (lifetime supply!)
- $ 25 polycarbonate food container
- $ 30 kitchen torch
------------------------------
$1,730 TOTAL

- Bags. Since I have a chamber sealer, the required bags are the "flat" kind, not the "mesh" kind that normal bar sealers use. That's an added benefit as the flat bags are much cheaper. Although, I found that since they are used mainly by restaurants, you can't by small quantities! They come in larger quantities like 1,000! I found one place on the web that sells smaller quantities: http://shop.vacuumsealersunlimited.com/Combo-Packs_c7.htm
- Container for the Polyscience IC. Since the Polyscience IC requires a separate water bath container, I needs to get one. For thermal reasons, the best bet would have been to get a "beer" cooler, but even the best ones didn't pass the "looks test". So I got a 5 Gallon (12" x 9" x 18") Carlisle polycarbonate food container (and lid) on the web from here: http://www.katom.com/028-1061207.html?CID=GoogleBase2. Looks great and inexpensive. Doesn't have great thermal properties, but that's a tradeoff for looks!

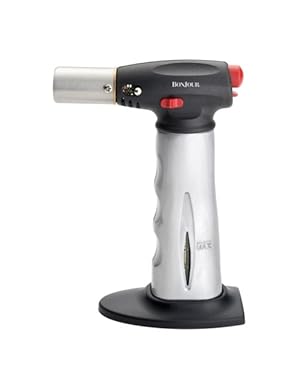
- Kitchen torch. So how do you get that "seared/brown" look for your sous vide food? Well, you can use your old fashion grill or oven broiler, or you can move into the 21st century with a kitchen torch! Yes, a kitchen torch is a "man's" kitchen tool! Imagine, man in kitchen with portable flame thrower! What a sight. But a kitchen torch is a more precise tool for getting a maillard reaction (browning effect). Make sure you use a BUTANE torch and not a propane torch. Propane has an ordor and will ruin your beautifully flavored sous vide food. I got a BonJour Chef's torch on amazon for about $30.

These complimentary tools include:
- Food Processor which is essential for making delightful sauces
- Squeeze Bottles which can be used to deploy your sauces with designer like accuracy
- Ring Molds which are essential for "stacked" plating techniques
- Silicon Brush used for different sauce presentations
- Zester which is a nice tool for creating ringlet toppings
So there you have it. Everything you need to sous vide till your heart's content! It's not inexpensive, but it will truly change your cooking experience for you and whomever you cook for! REALLY!!!
Top of Page


5 comments:
It new idea that u create in ur blogs.. It very simple and different... Kitchen Equipment
It is indeed very simple and gives the chef more flexibility in planning and cooking a meal. Thanks for the note!
Very interesting blog! I'm a tech guy as well, who've fallen in love with sous vide cooking.
I'm gonna switch from my SVS to an immersion circulator. I'm choosing between the Polyscience one, and an European circulator called Swid from Addelice.
My main concern with Polyscience is the noise. Is the Polyscience circulator very noisy? It's difficult to judge from videos I've seen, and I've never seen it in real life. Would you, for instance, be able to hear it through a closed door?
The Polyscience circulator does have a low whirling noise. It's not very loud, but it is constant. I don't think you would be able to hear through a door, unless your ear is trained on hearing that sound and the house is very quiet. I, myself, find that if I'm cooking a long sous vide time (like 8+ hours), I use the SVS since it is completely quiet.
I'm a bit worried about the noisy when it comes to those long cooking marathons. Actually, I could't care less but the rest of the family probably begs the difference. The Swid can only handle 5.5 gallons of water, so it's a bit more silent because of the less powerful pump.
By the way I laughed at your comment about the wife-approval-factor of the SVS :-) I hear you!
Post a Comment